1. Pre-requirements
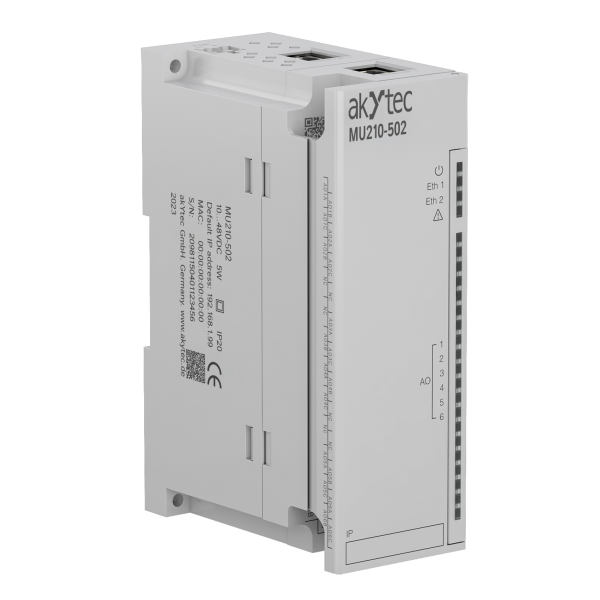
For physical connection, you will need a micro USB.
Tool PRO can be found on our website.
2. Connecting Mx210 with Tool PRO over micro USB
Open Tool PRO on your PC.
Connect the micro USB to Mx210 and the other side of the cable to your PC. Then, click in Tool PRO’s window on "Add device," as shown in Picture 2.1.
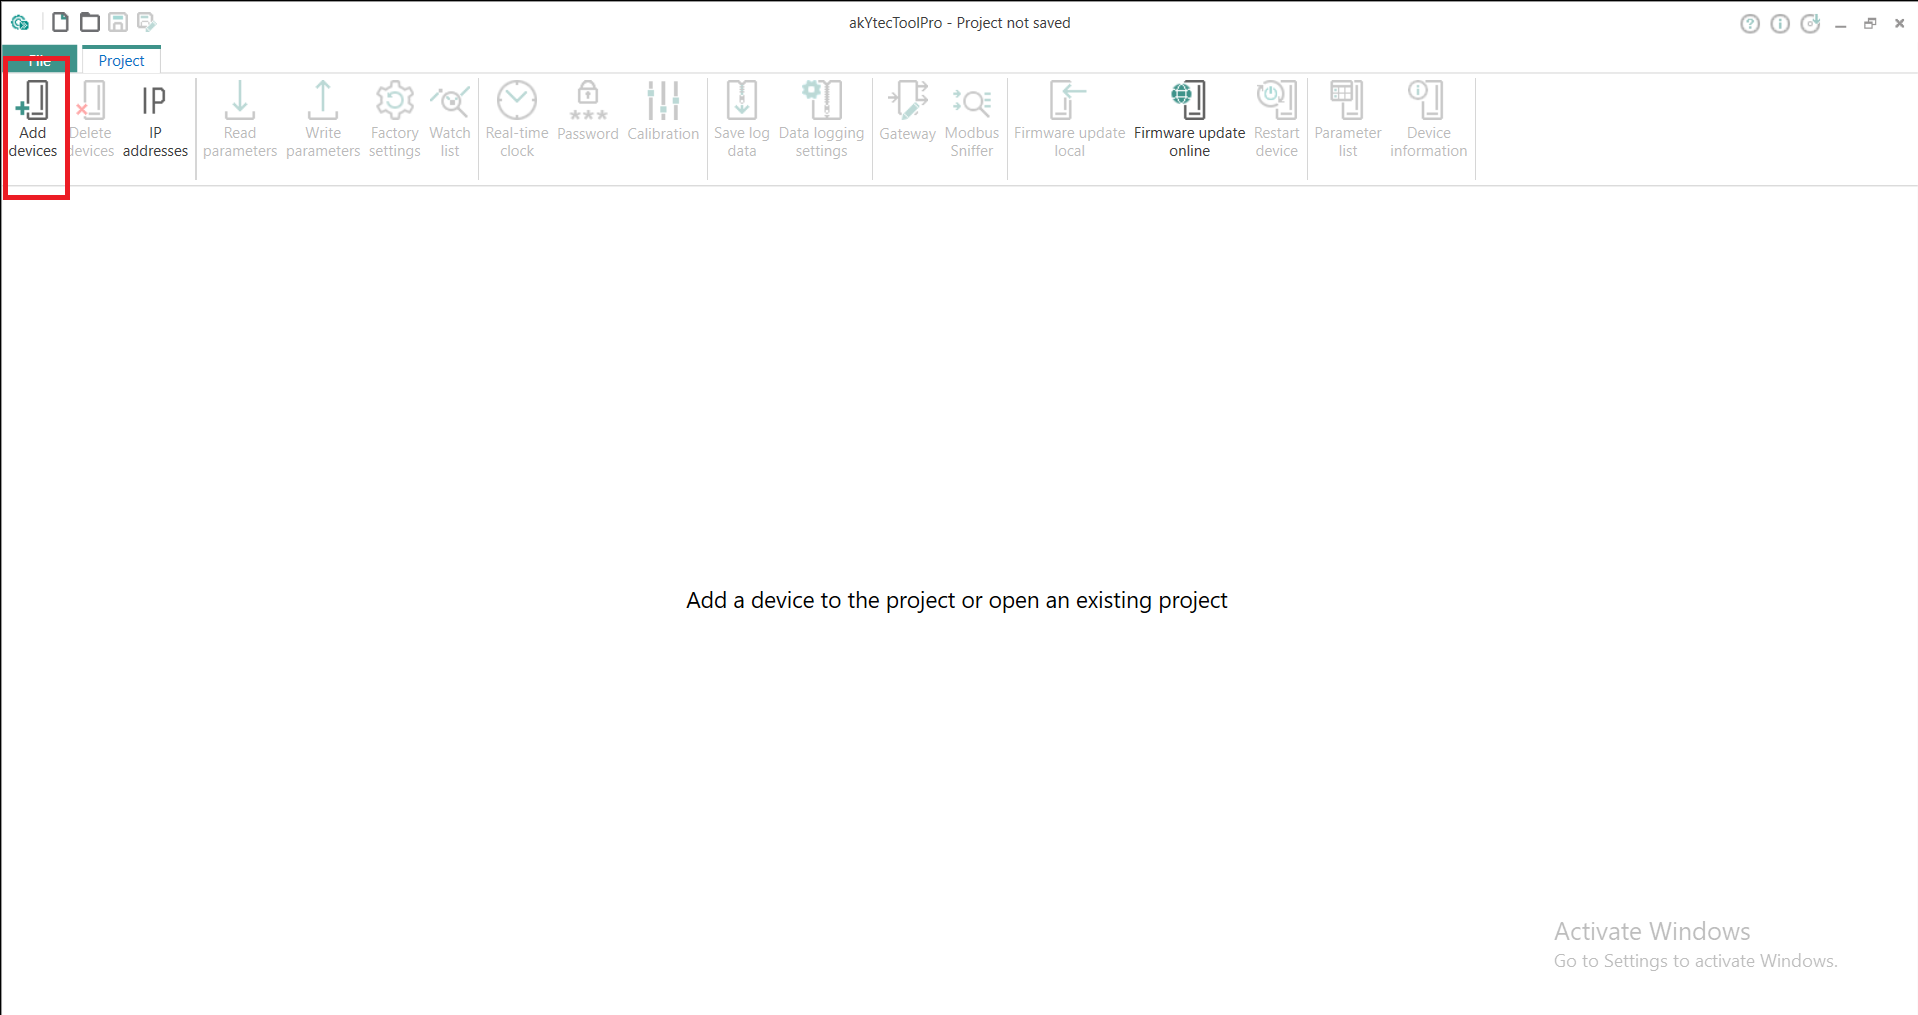
Picture 2.1
Now, in the new window, configure Network parameters as shown in Picture 2.2.
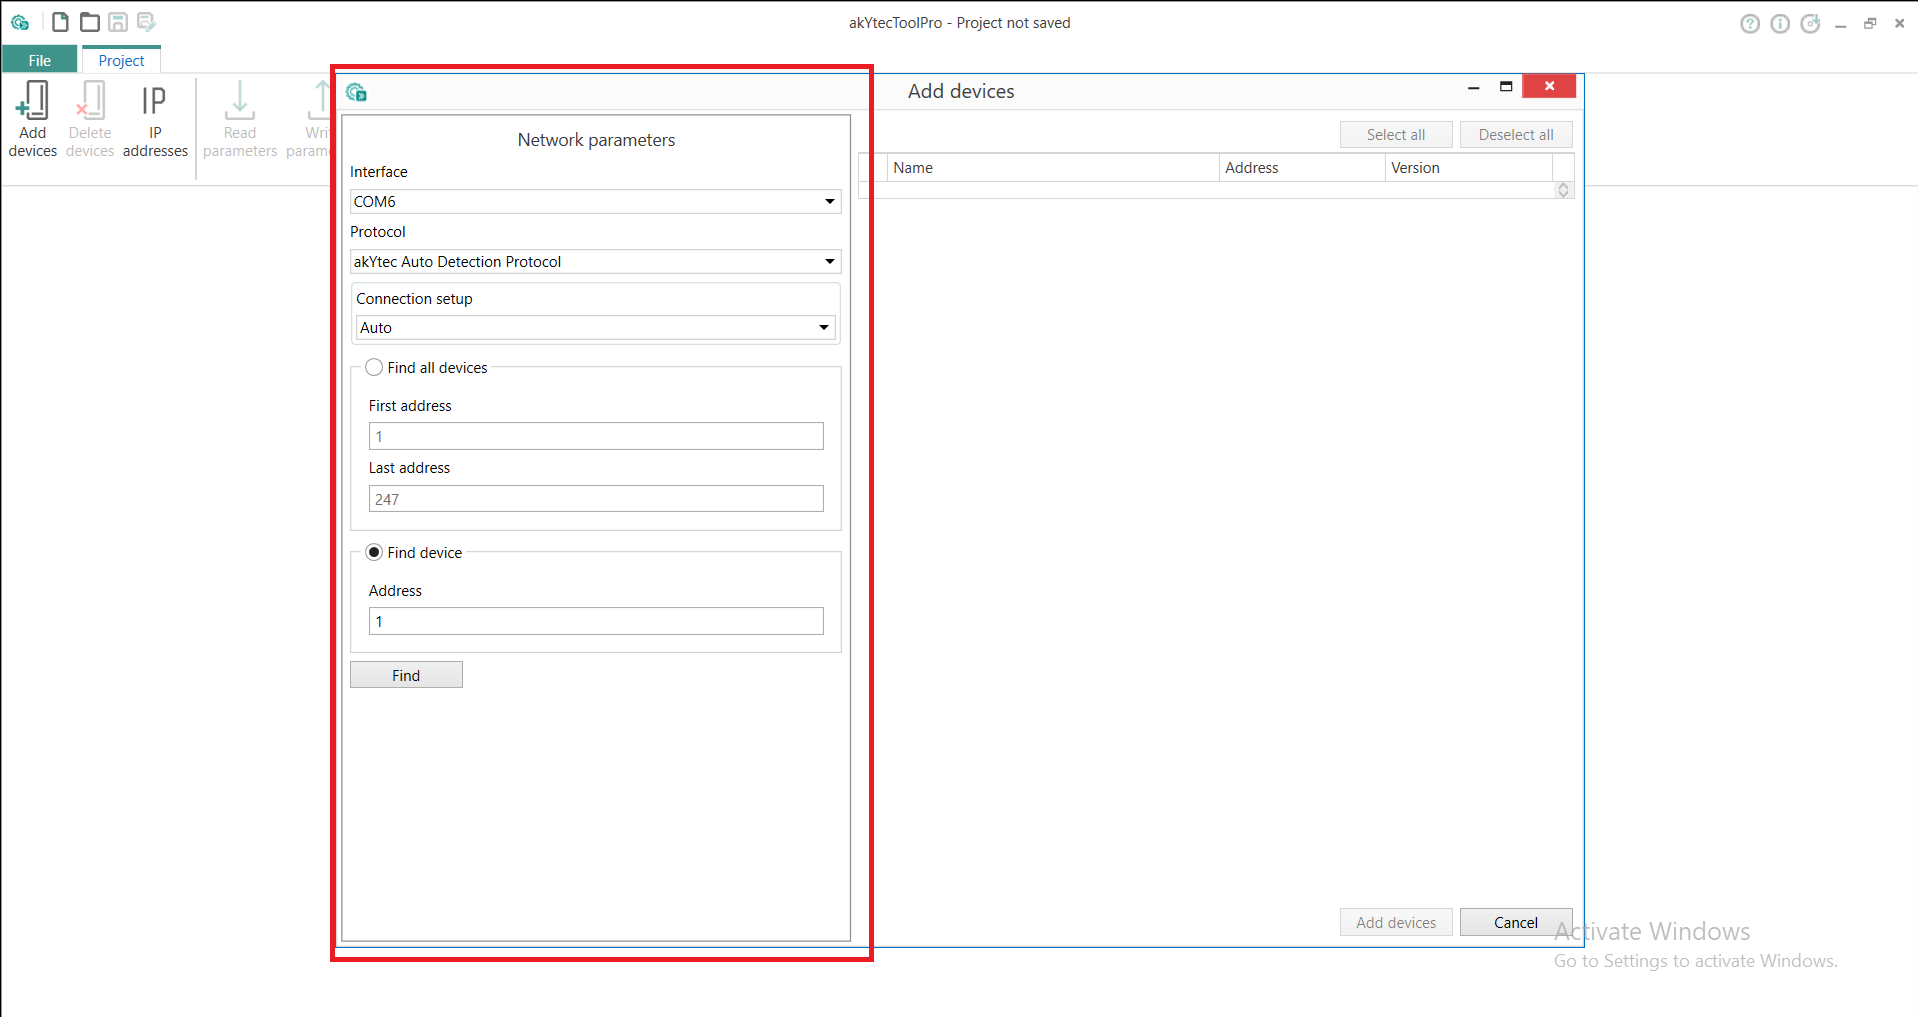
Picture 2.2
As you can see, the first parameter is Interface. Since we are using micro USB, select COM (in our situation it is numbered as 6, but it can be any number). Other parameters are for the automation of device detection, so set them as shown in Picture 2.2. However, the last one "Find device-Address" is a bit different. First, insert number 1 into "Address" (it is factory default and cannot be changed) and then click on "Find". If the device couldn’t be found, then select "Find all devices" and fill in the next two cells as shown in Picture 2.2.
If the device was successfully detected, it will appear on the list as shown in Picture 2.3. Then, check the box and click "Add devices."
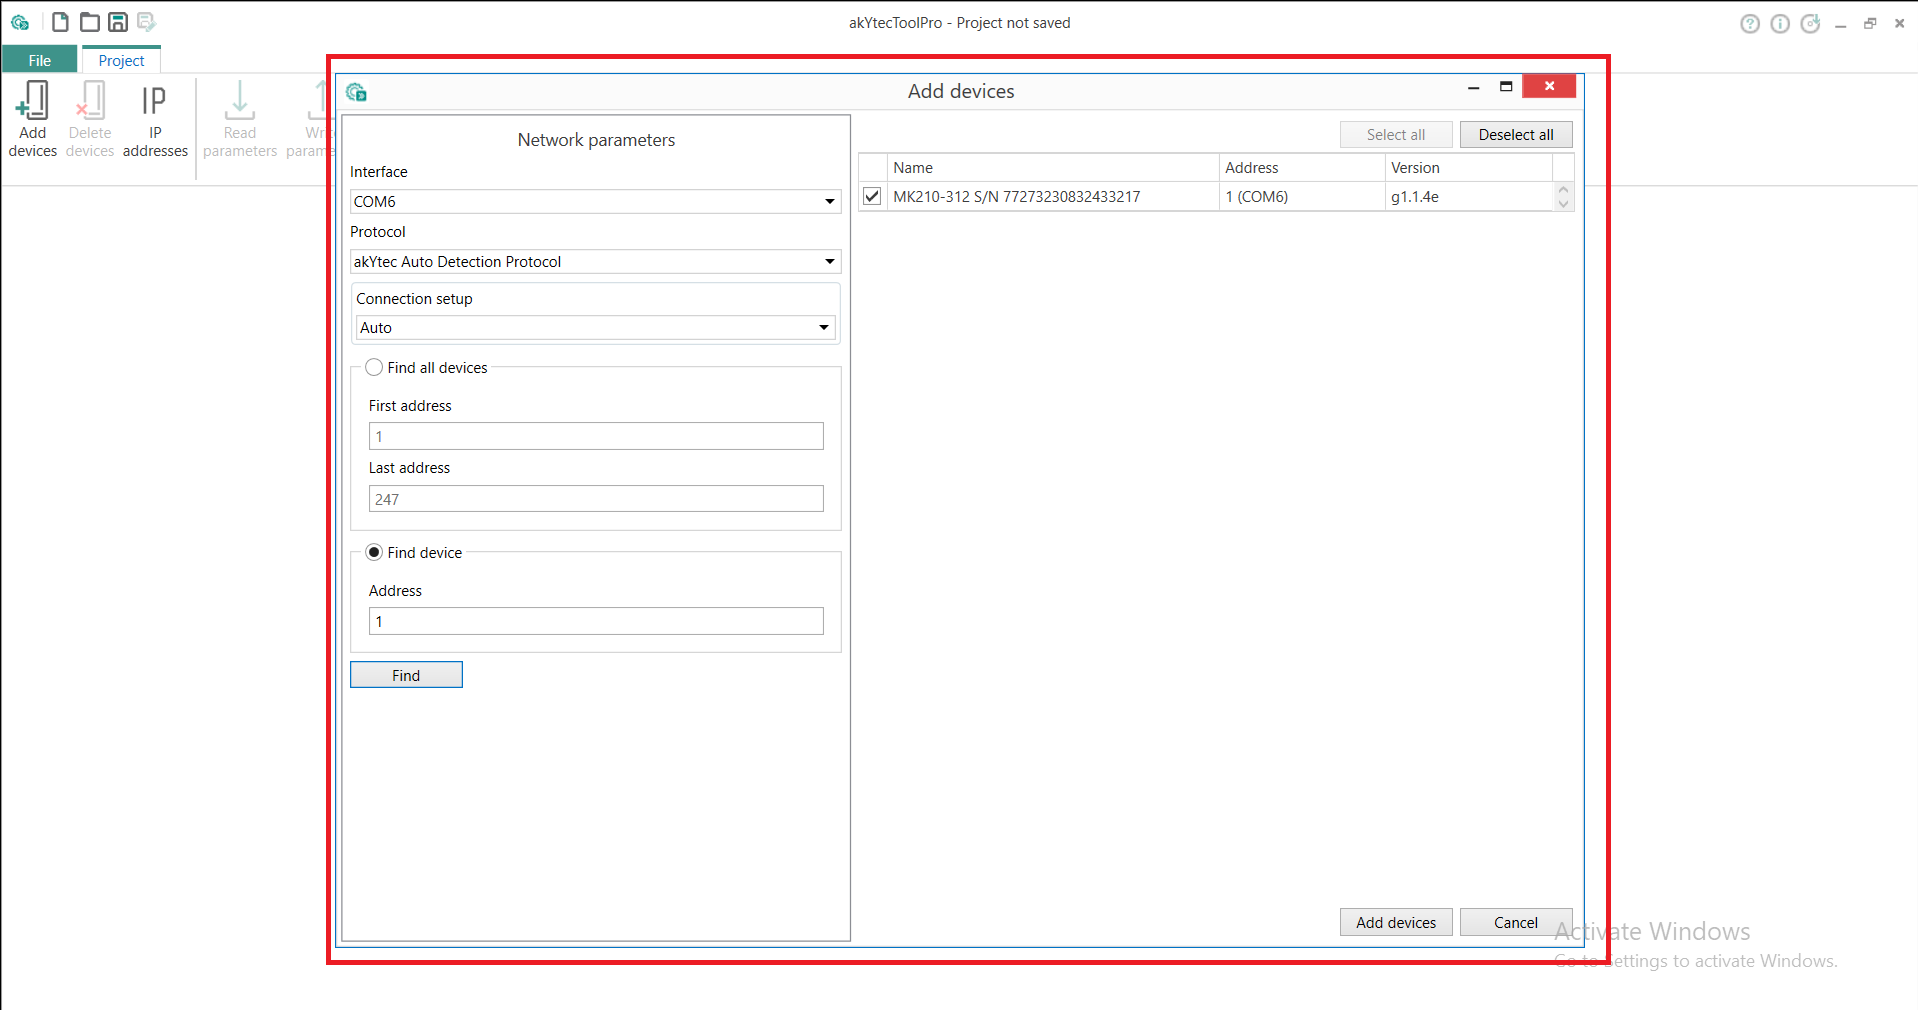
Picture 2.3
If there is no table with cells after you have clicked on "Add devices," try and click on "Read parameters," as shown in Picture 2.4.
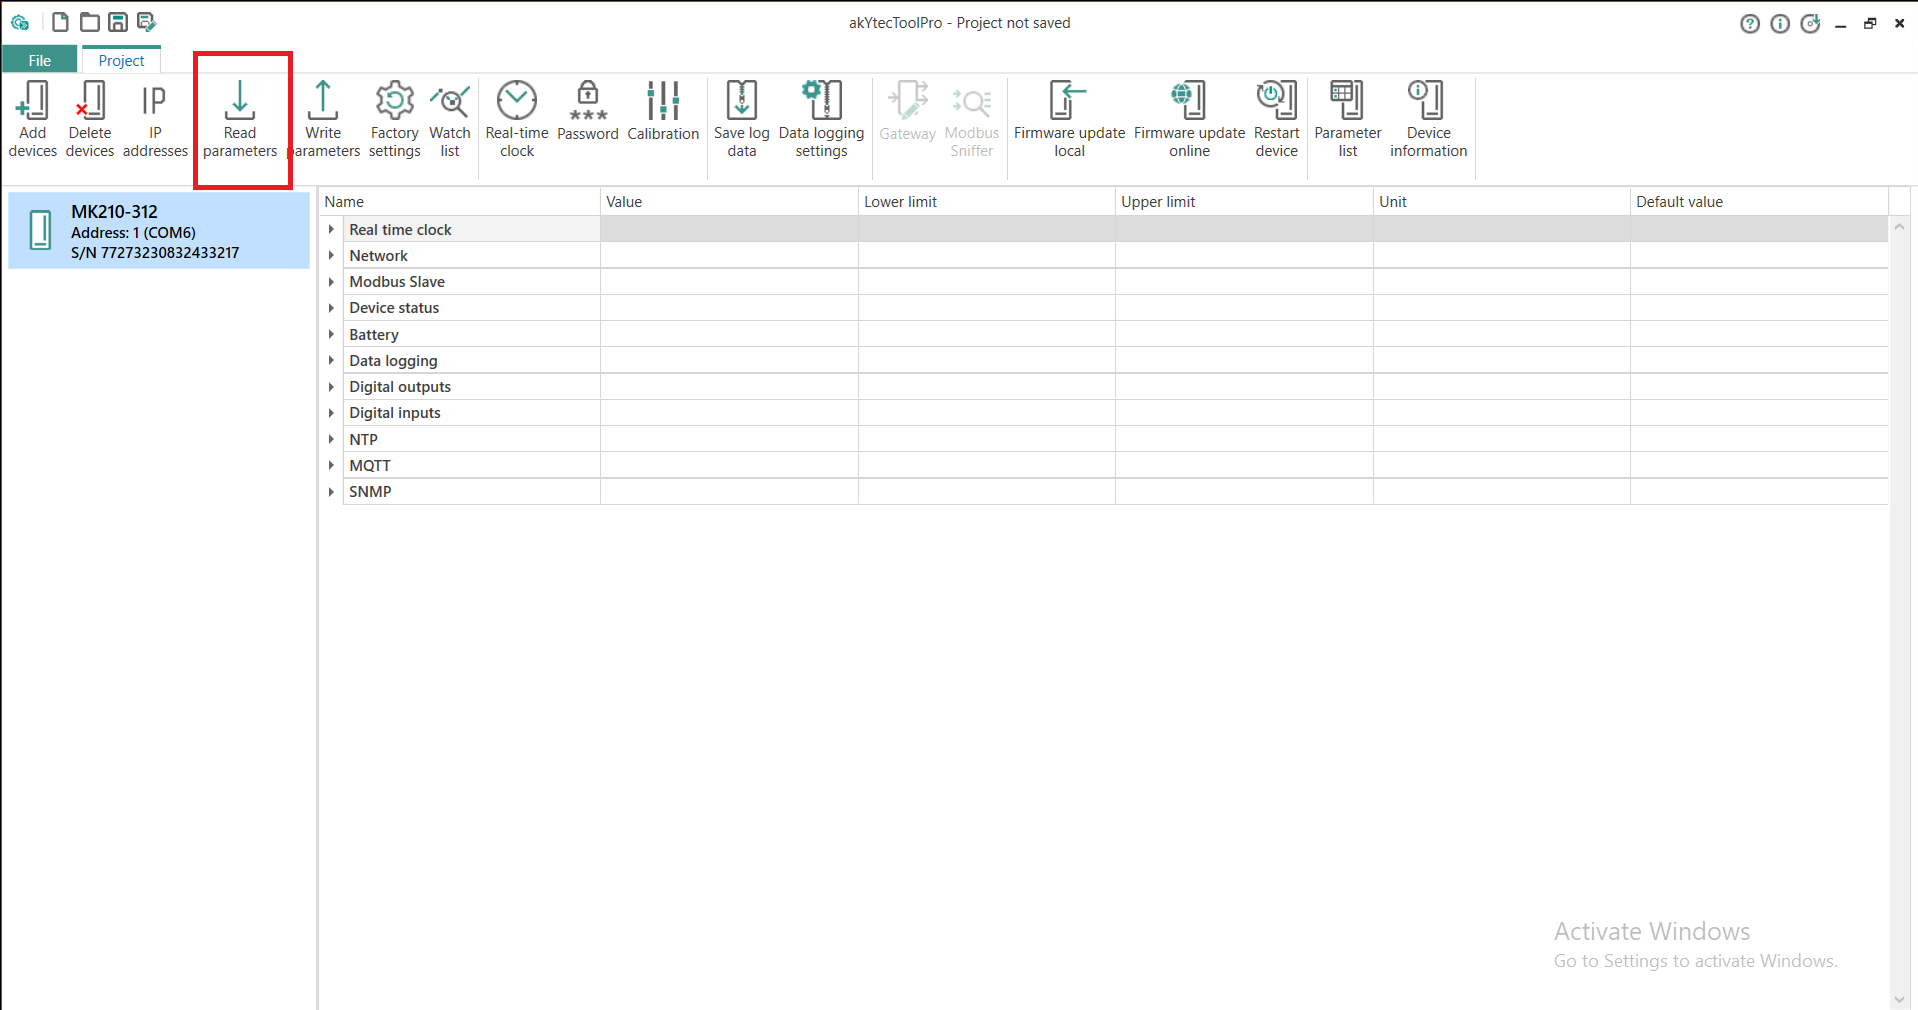
Picture 2.4
3. Connecting Mx210 with Tool PRO over Ethernet
For this, along with what is mentioned in the pre-requirements section, you need the IP address and Subnet mask of your Mx210. The factory-set IP address is written on the side of the device (in our case it is 192.168.1.99 and the mask is 255.255.0.0. The mask is not written on the device but the mentioned one is the default). However, if you don’t manage to connect to the device with the factory-set IP address in the following steps, that means that the IP address has been changed in the past (as it is in our case; notice that the last digit of the IP is 15)./p>
Now, follow all steps from section 2 of this document (at the end you will have the IP address of the device) and read the network parameters.
Go to the network settings of your PC, double-click on the Ethernet port, select IPv4, and click on properties; it will look like Picture 3.1.
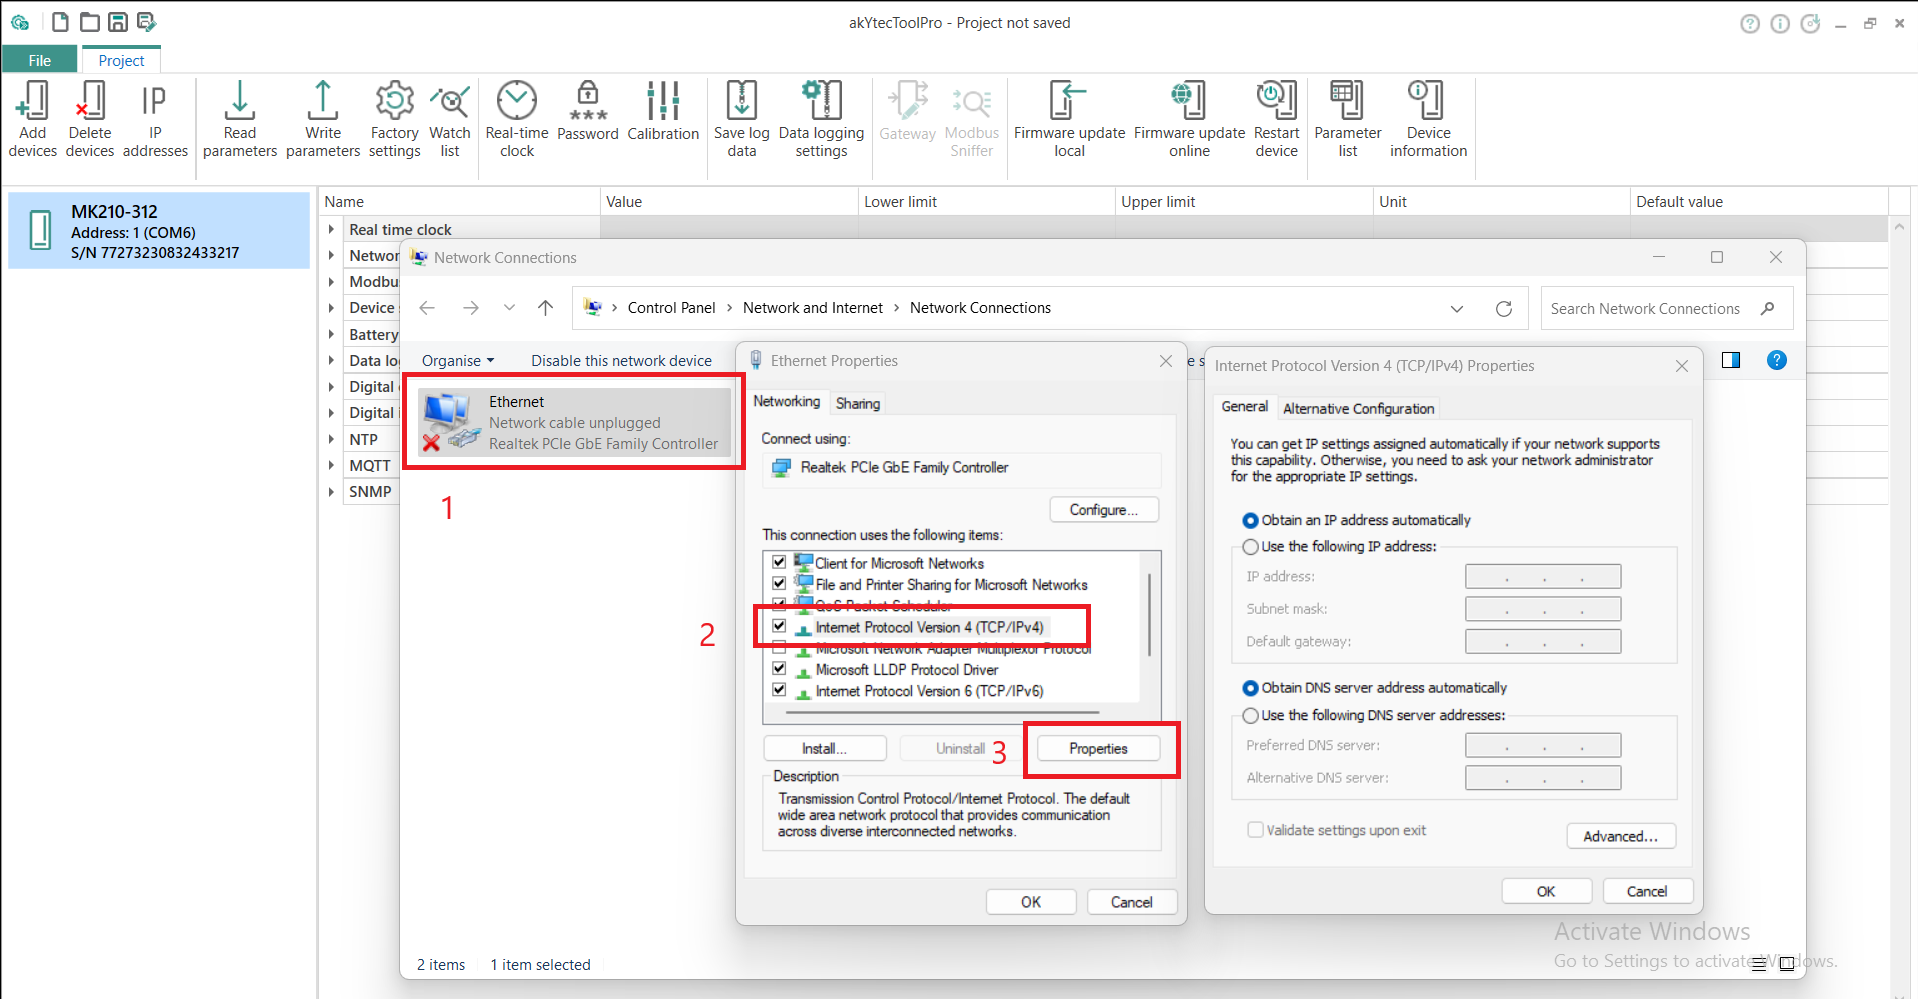
Picture 3.1
In the last window, select “Use the following IP address” and then insert the IP address and Subnet mask of your Mx210. The last number of the IP address has to be changed because now we are configuring our PC to communicate with the Mx210. You can put any number from 1 to 255.
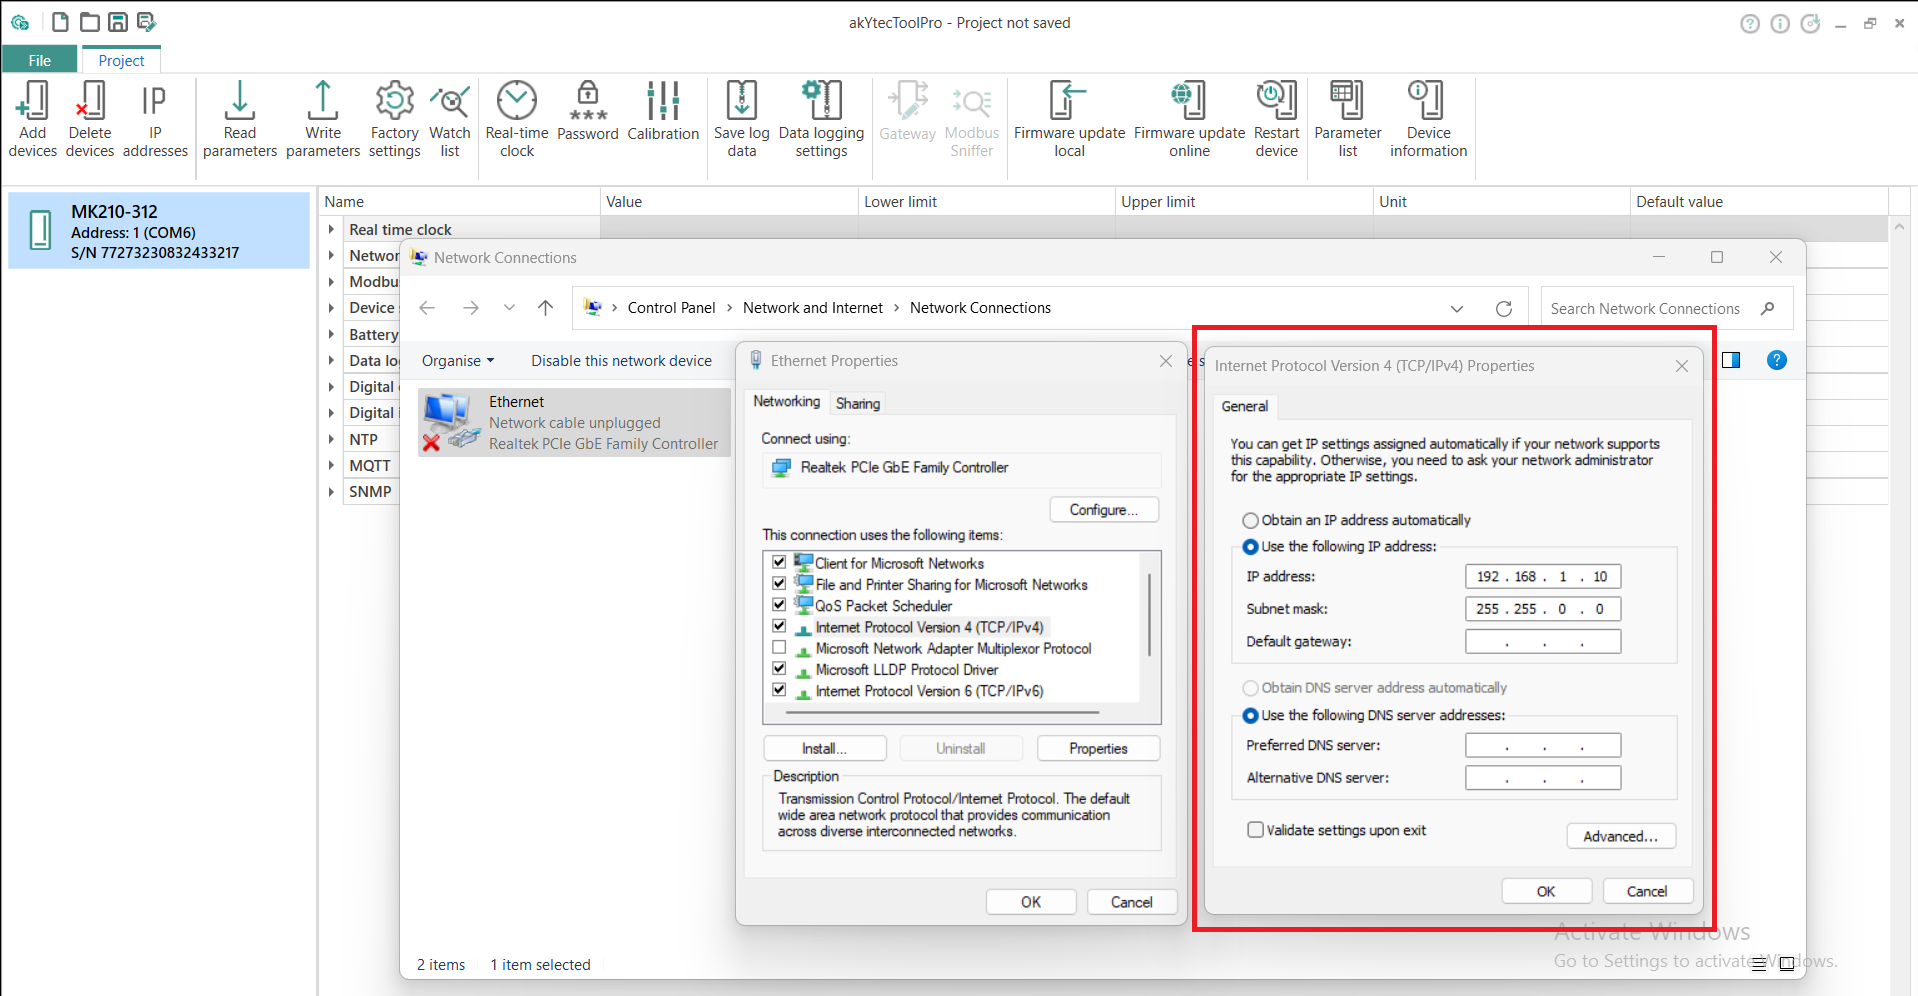
Picture 3.2
Now click OK on this window and on the “Ethernet properties” window.
Connect the Ethernet cable to Mx210 and the other side of the cable to your PC. Then click in Tool PRO’s window on "Add device," as shown in Picture 2.1.

Picture 3.3
Now, in the new window, configure Network parameters as shown in Picture 3.4.
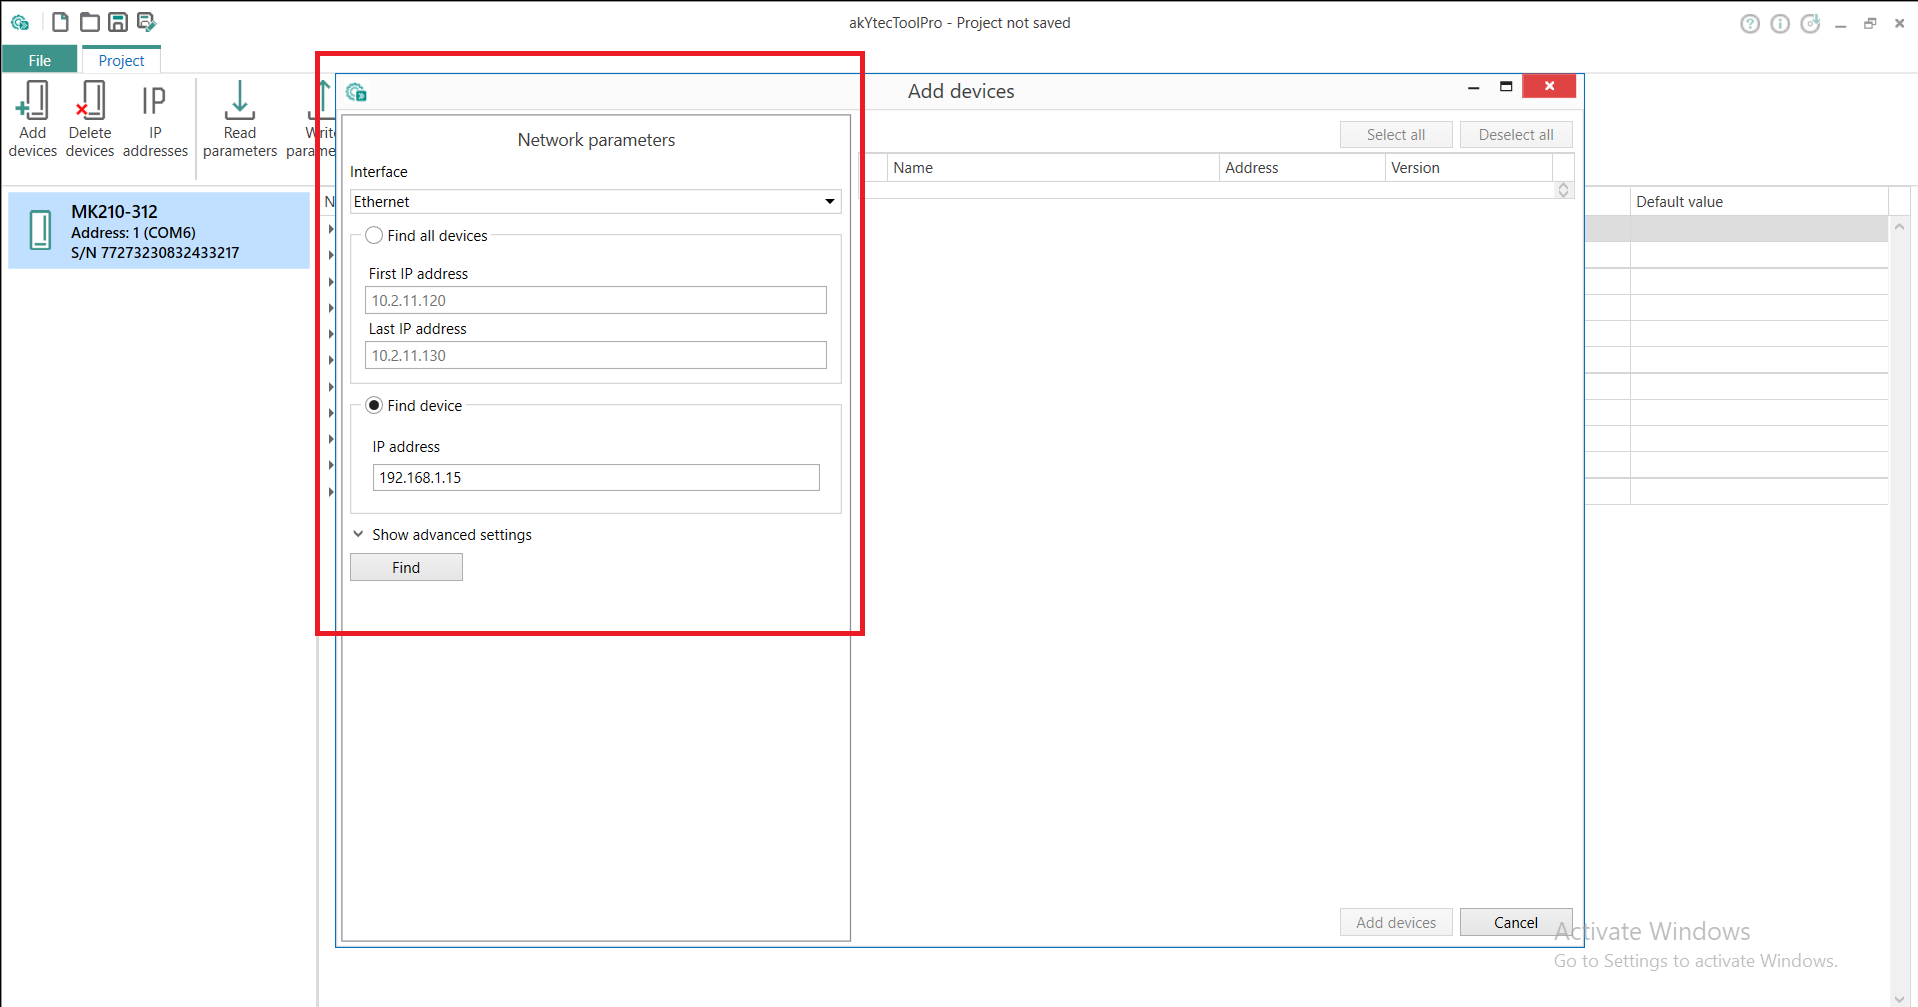
Picture 3.4
4. Configuring Mx210
For setting up communication between Mx210 and, for example, our PR103, it is important to configure parts of Network-Ethernet as shown in Picture 4.1.
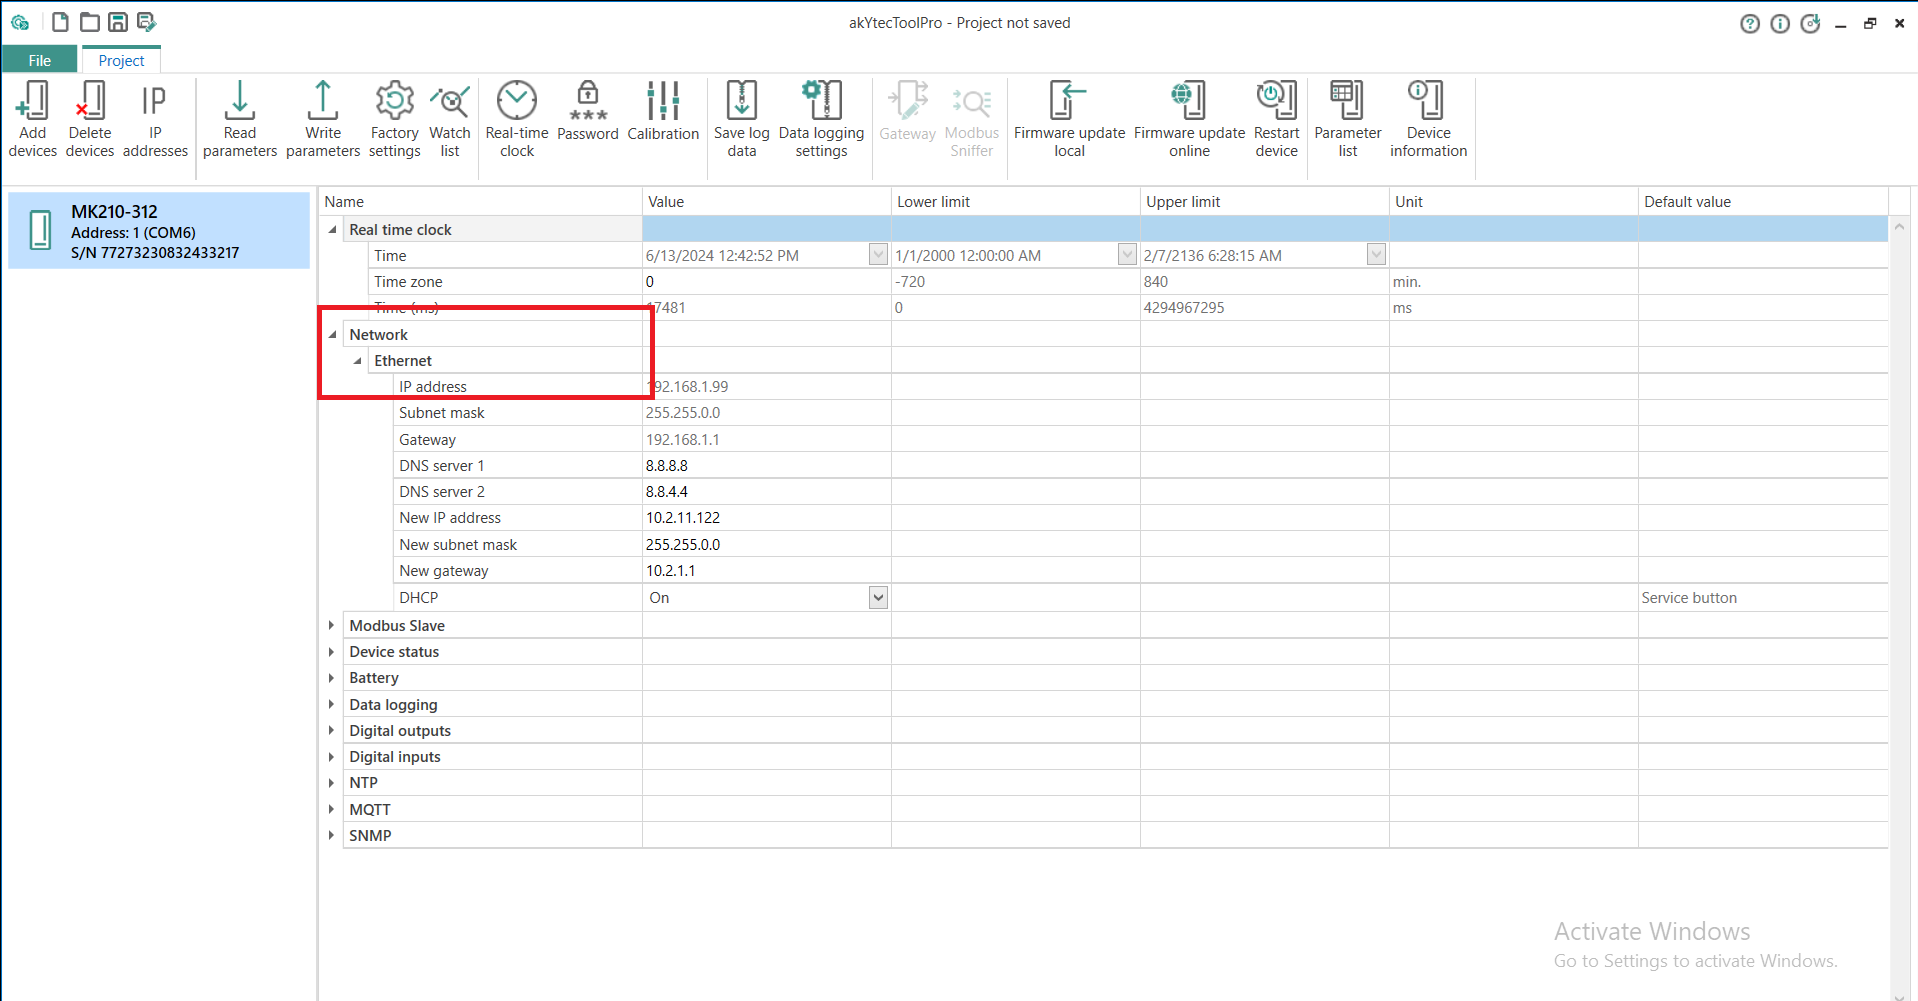
Picture 4.1
Now you need to change all of these parameters according to the ones on PR103 (or another device you are going to connect Mx210 to), or type these existing parameters into PR103. If you don’t know the addresses of registers that you will use to transfer data from Mx210, click on "Parameter list", as shown in Picture 4.2.
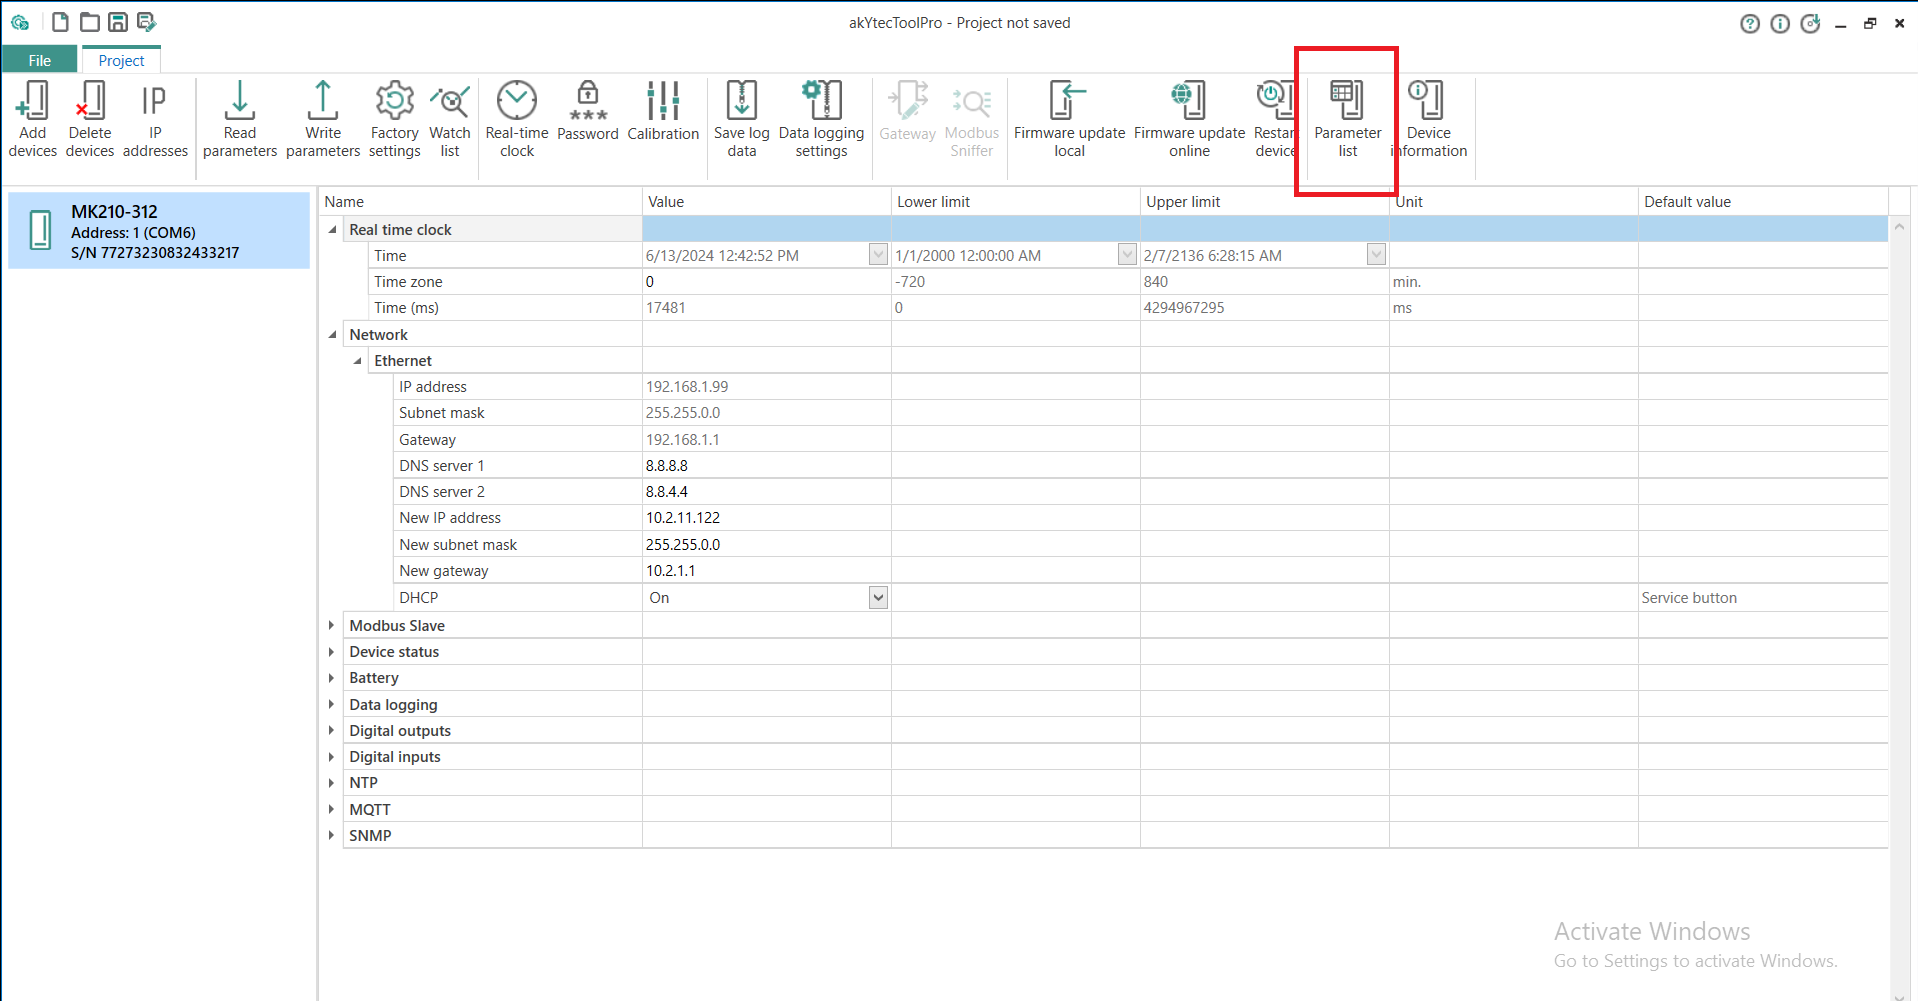
Picture 4.2
5. What to do if IP address or Password is forgotten
In case of a forgotten IP address, use a micro USB cable and follow sections 2 and 4 of this document to retrieve the IP address. If the password has been forgotten, power ON the device, open the front cover, and then press and hold the Service button for at least 12 seconds. The location of the Service button is shown and marked with number 7 in Picture 5.1.
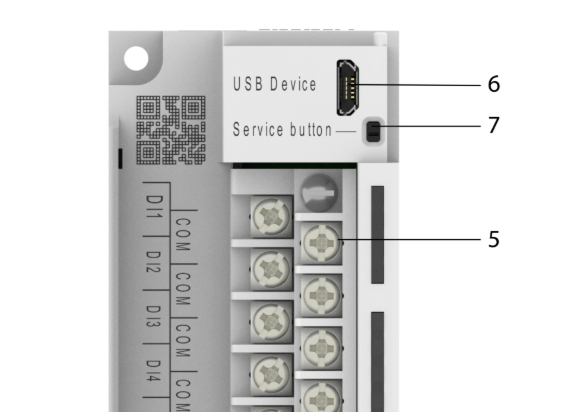
Picture 5.1
6. Factory settings
If you desire to bring Mx210 to factory settings, go to Tool PRO (follow section 2 of this document) and when you successfully read the parameters of the device, click "Factory settings" and then click on "Write parameters" as shown in Picture 6.1.
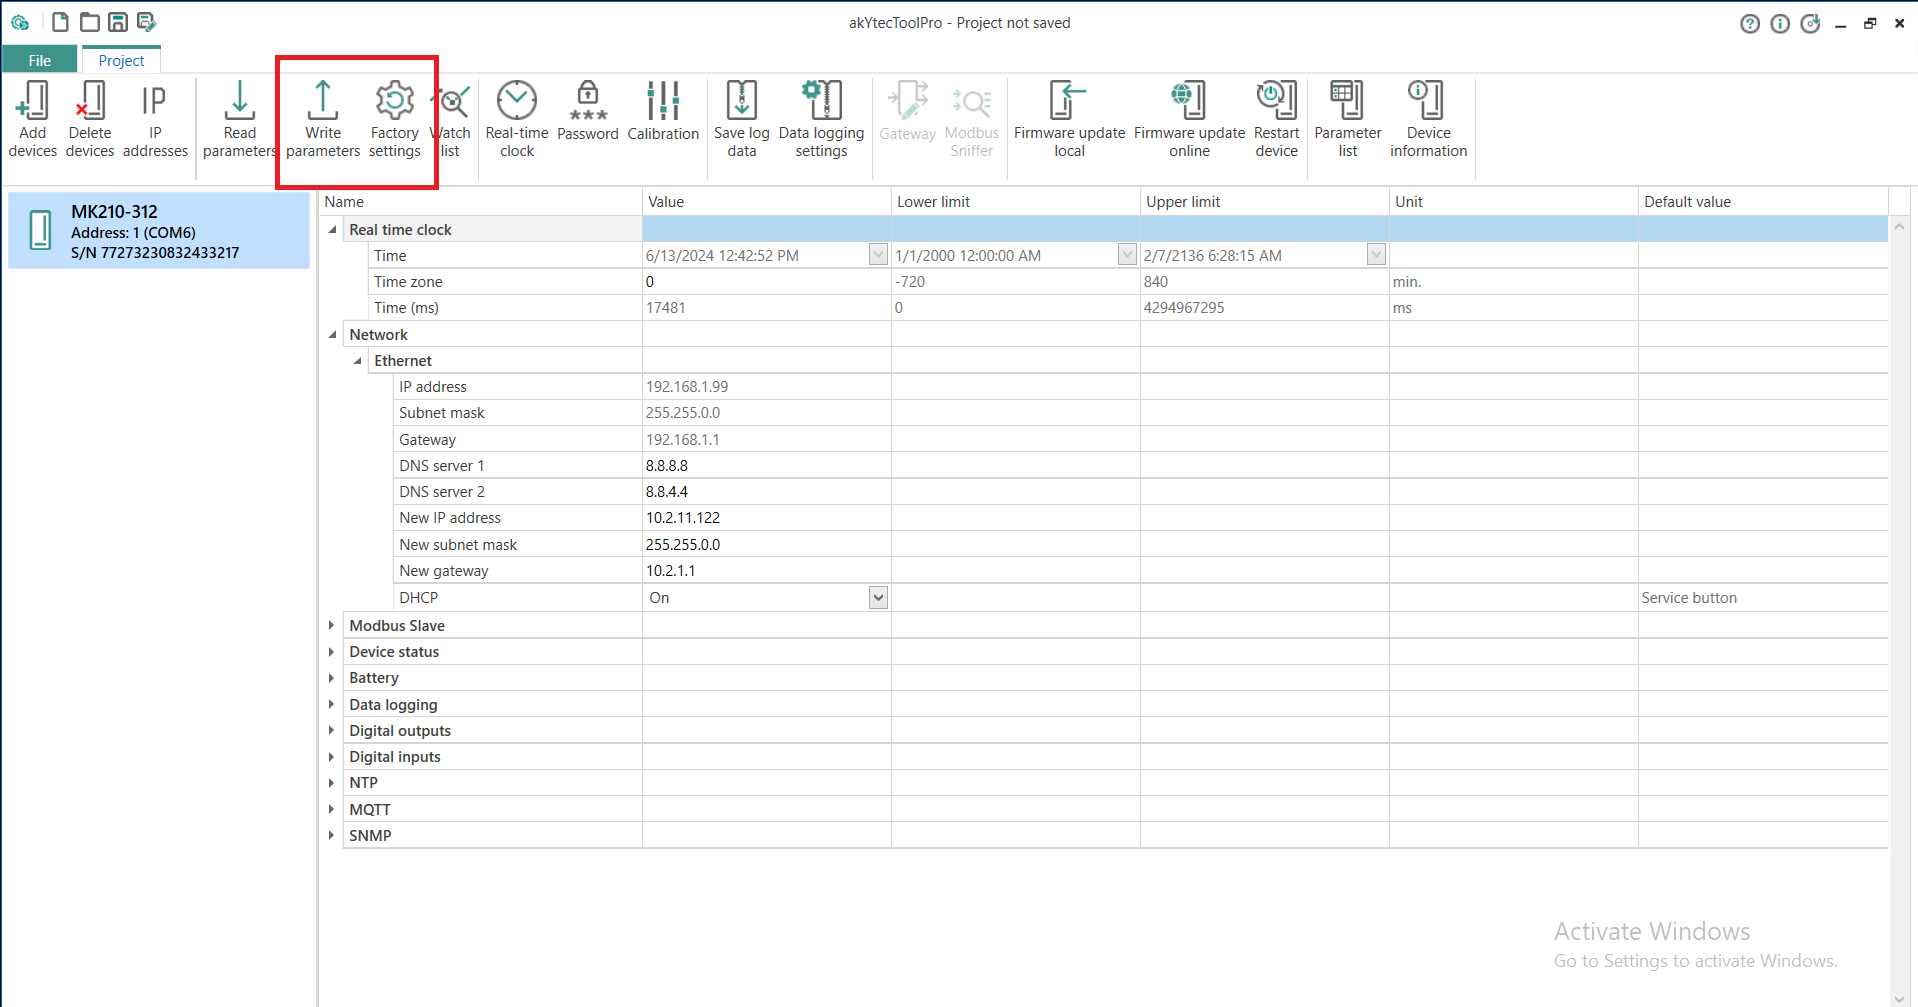
Picture 6.1
NOTE :
The previously presented factory reset does not affect the network parameters of the device; they can’t be “automatically reset,” they have to be manually changed.
7. Configuring network settings of multiple Mx210 modules at same time
Note :
The following steps will be taken in such a way that this explanation and configuration ends up as simple as possible, so experienced users can take different steps.
The pre-requirement is an Ethernet cable for each Mx210.
If you want to configure network settings of multiple Mx210 modules, first configure your PC’s network settings as shown in section 3. Because the default IP address of devices is 192.168.1.99 (even if it was changed in the past, it probably starts with 192.168.X.X), set your PC’s address as you will (here we will set it as 192.168.1.10, as shown in Picture 3.2).
Connect Ethernet to the first Mx210 (Ethernet 1 port) and to the PC, then connect all other devices with an Ethernet cable (example: First Mx210’s Ethernet 2 port connects to Second Mx210’s Ethernet 1 port, and so on). Open Tool PRO, and click on "IP addresses", as shown in Picture 7.1.
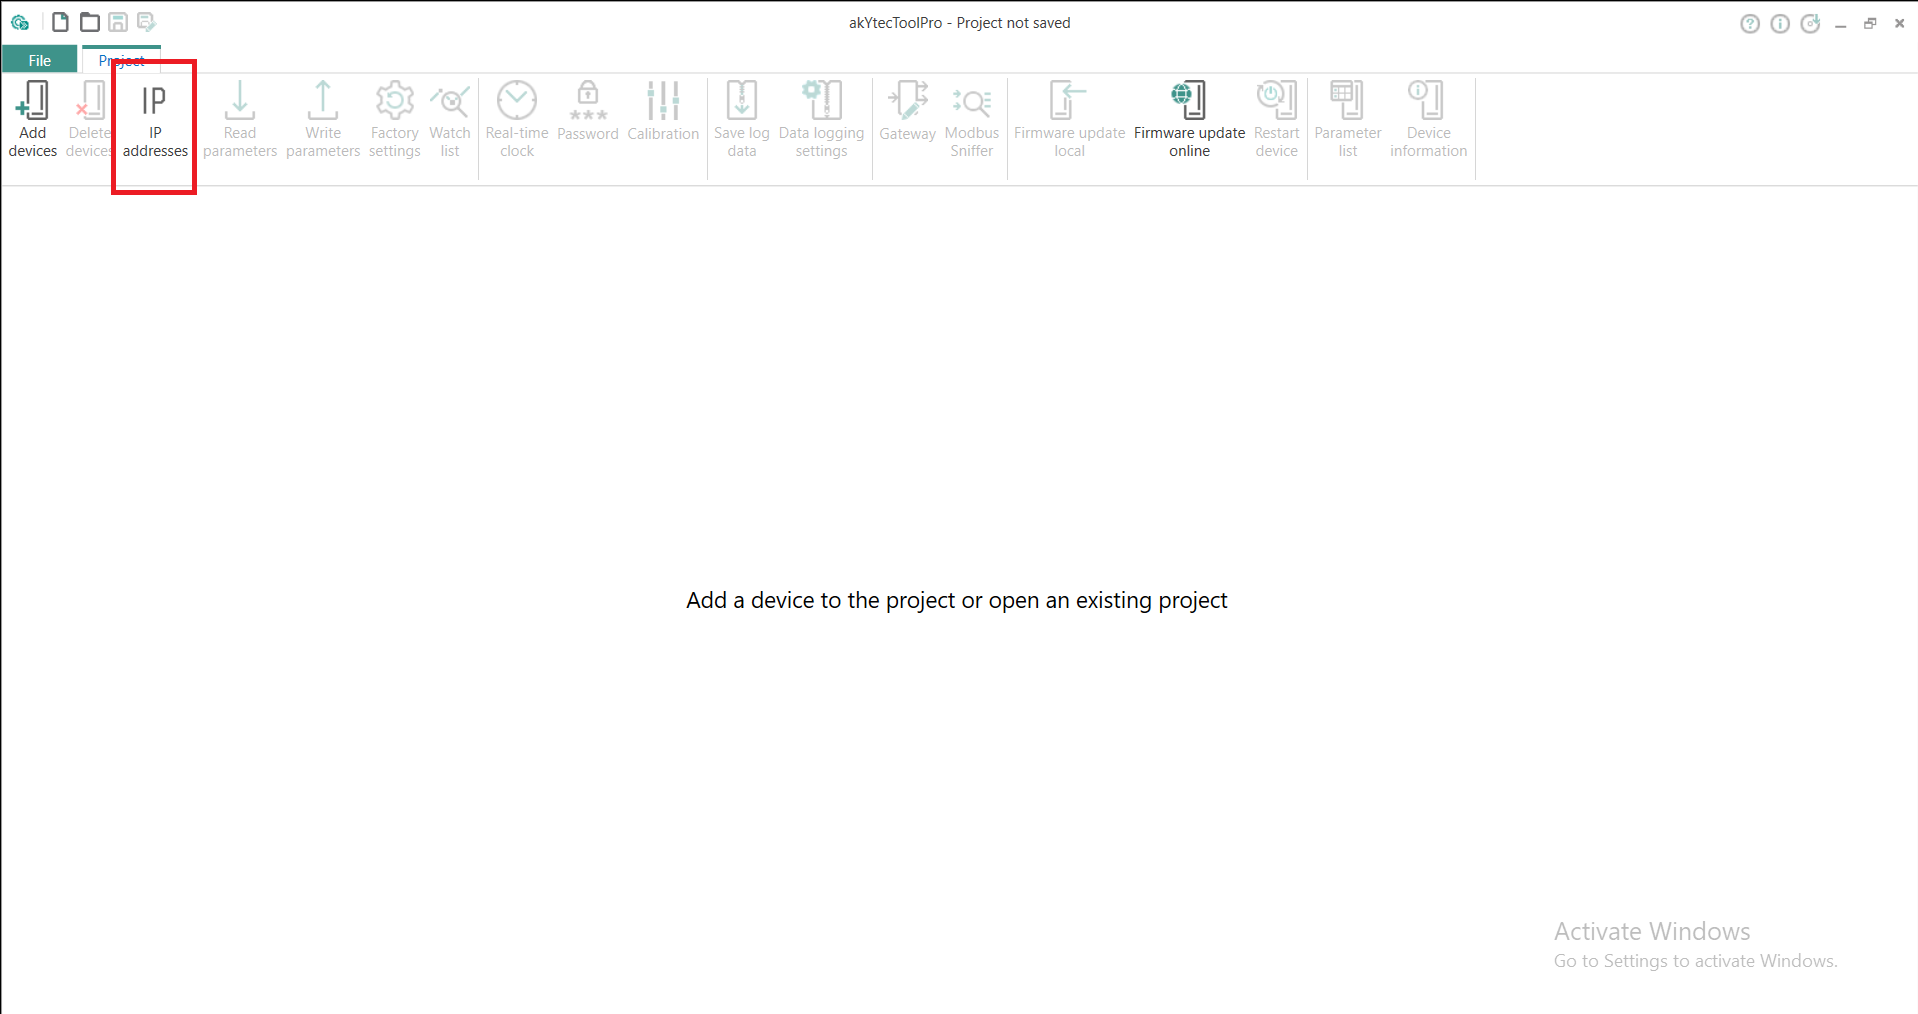
Picture 7.1
On the left side of the newly opened window, you can see the section New IP address. Modify the last two numbers at your will of the IP address that is already inserted (in our case it is 192.168.1.11, because it will increase your PC’s IP address by 1). Our recommendation is to change only the last number (in the range 1-255, but choose a number that is bigger than the PC’s number).
Now, the Service button (shown in Picture 5.1) should be clicked on each device, in the order in which you want to spread IP addresses. After each successfully set IP address, the next one will be automatically increased by 1. At the end, it should look like Picture 7.2.
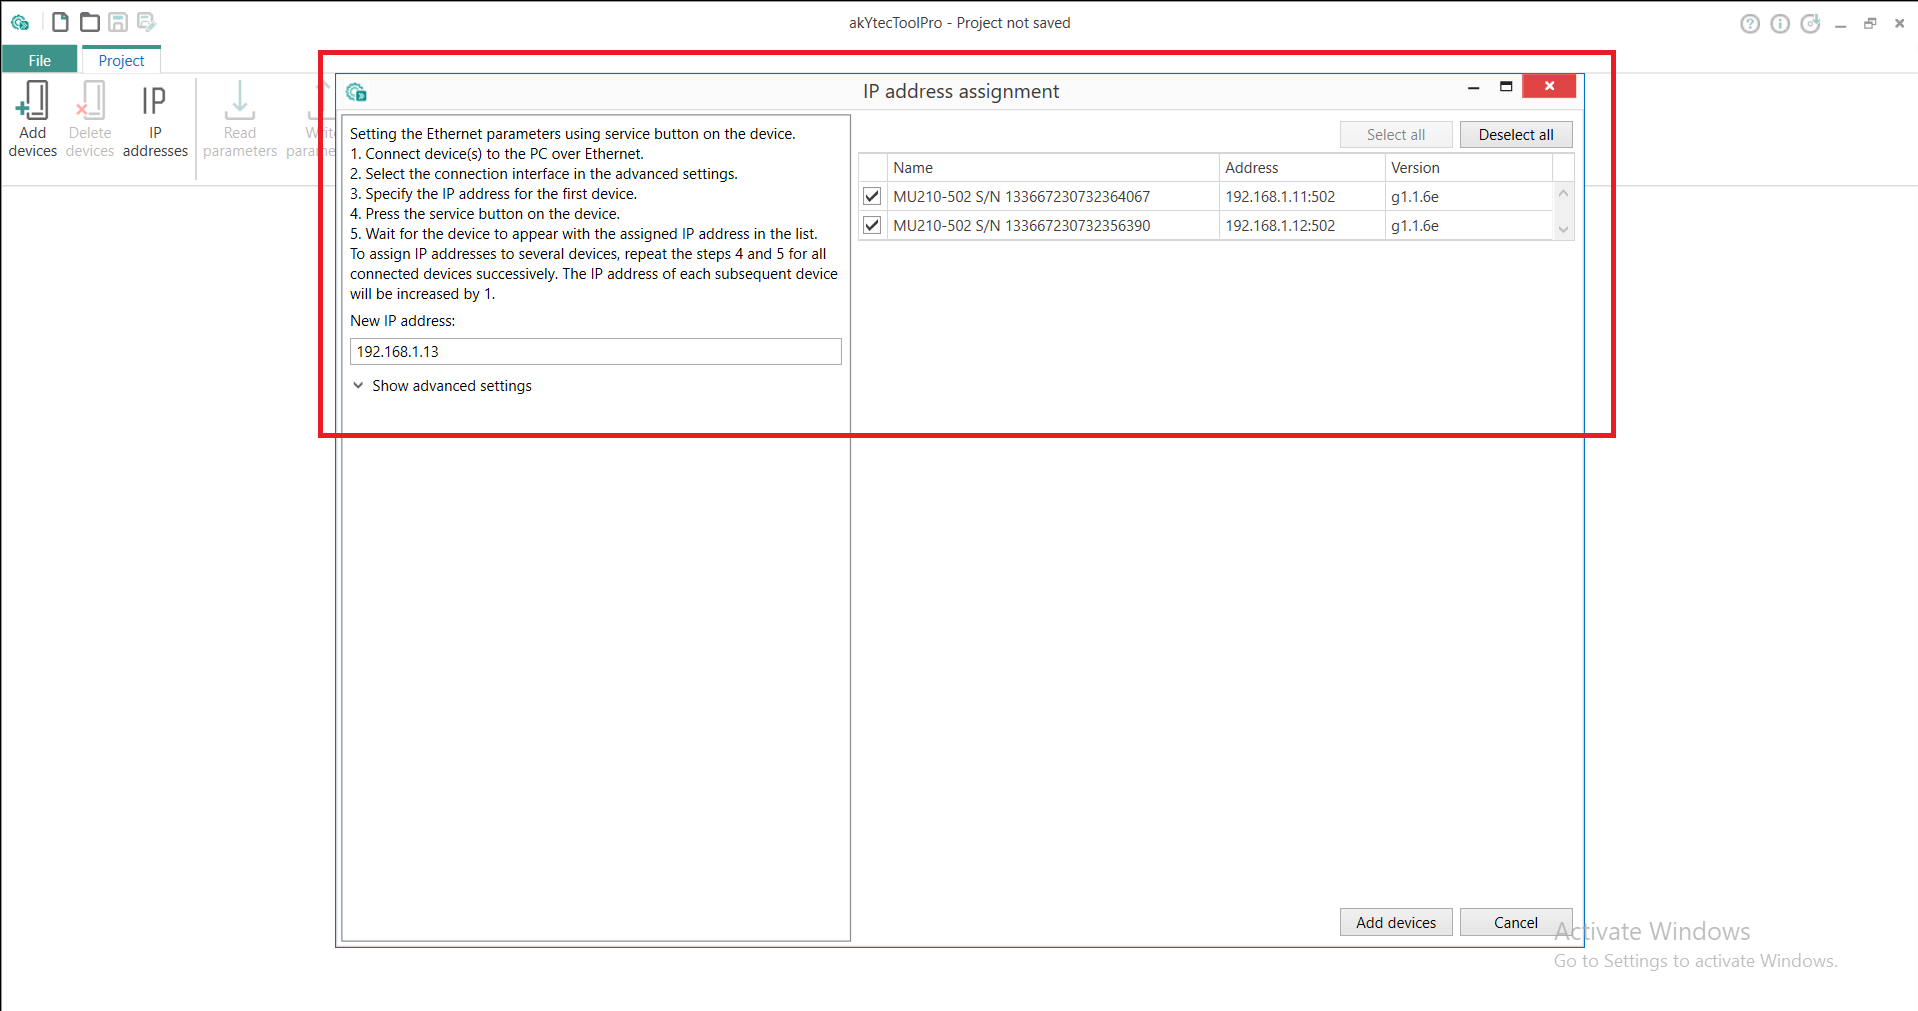
Picture 7.2
Now click on "Add devices" and that would be it.
akYtec products used in the project


